How to Applique Baby Quilts
By Andrea Hunter
Applique is a creative technique, often used in quilting. It can also be intimidating if you've never tried it before. Here are some simplified instructions, for those who wish to attempt this sometimes dreaded task. An applique stitch is a stitch used to attach one piece of fabric to another. In quilt making, this method is often used to attach simple cut outs to a base fabric. The applique stitch will accomplish two things. First, it will securely attach the cut out to the block. Second, it will keep the edges of the cut out from fraying. Below, you will find step by step instructions on how to applique.
1) The first step is to cut out a quilt block and also the shape you wish to attach to the block. If you have purchased a pre-cut quilt kit, this will already be done for you.
2) Next, you will use a light weight fusible web (sold as Stitch Witchery, Heat N Bond, etc.) to attach the cut out to the block. This will prevent the cut out from moving around while you applique. Washing the fabrics before starting the fusing process, will ensure that the fusible web will adhere to the fabrics. Follow the instructions that come with the fusible web to attach the cut out(s) to the quilt block.
Note: If you don't have fusible web, you can use straight pins to attach the cut outs, but you will likely have puckers in your cutout when it is appliqued. To center a name on a block, start with the middle letter of the name. For example, if you have the name, "AVERY", you would start with the letter "E". Place the "E" in the center of the block and press. Then place the "V" and the "R". Then place the "A" and the "Y".
3) Choose your thread color. If you are a beginner, it is a good idea to choose a thread color that will blend in with the shape you will applique'. This will help to hide any mistakes, as they will blend in with the shape(s) and seem unnoticeable. If you are pretty confident and experienced, with a sewing machine that takes fairly uniform stitches, you may want to coordinate your thread with an accent color on your quilt. In this case, you would choose a color much different from the shape that matches another color on the quilt that you want to bring out.
4) Test your tension! This step is very important and is one that you should try on scrap pieces of fabric. This way, you won't mess up your masterpiece! Take two scraps, one that is smaller than the other one. Use your zigzag stitch to sew the smaller piece on top of the larger piece. Sew along the edge of the smaller piece so that the needle alternates, taking a stitch on the smaller piece, and a stitch on the larger piece, attaching the two together. Make sure your stitches are even. Your zigzag stitches should also be very close together, to create a satin stitch, so the edge of the cut out is not exposed when you are finished. If your stitches are not satisfactory, adjust your tension, a little at a time, until you get the desired results. If adjusting your thread tension doesn't work, try adjusting your bobbin tension.
5) Now for the fun part! It is a good idea to start on a corner so the place where you start and end will look as smooth as possible. Sew around the shape(s) with a zigzag stitch. If you are going to applique' more than one shape, such as a name, start with the center letter first. As you sew around the shape, pause and turn on the corners, to keep an even stitch, all the way around. Try to end so that the place you start and end looks continuous.
See, that wasn't so difficult. You should now have an appliqued piece of work, that you can show to all of your friends, and be proud of.
Andrea Hunter is the co-founder of Sandrea Baby Quilts. http://www.sandreababyquilts.com offers handmade and personalized baby quilts, baby quilt kits, baby quilt patterns, receiving blankets, and free tips for quilters.
Article Source: http://EzineArticles.com/?expert=Andrea_Hunter
http://EzineArticles.com/?How-to-Applique-Baby-Quilts&id=1763936
Quilting Weekly offers you both paid and free quilting lessons. Whether you are looking for patterns and instructions or just need some advice Chris Dahl (the owner and head teacher) is always ready to lend a hand! Her Mother Goose Baby quilt pattern is one of the most popular classes on the site today.
Showing posts with label baby quilts. Show all posts
Showing posts with label baby quilts. Show all posts
Thursday, August 6, 2009


Saturday, July 25, 2009
Great Ideas For a Quilt Baby Blanket Gift
Great Ideas For a Quilt Baby Blanket Gift
By Jackie Lee
Making a handmade quilt for a new mom is a gift that will be treasured and loved for generations. There are many people who choose to keep handmade quilts as family heirlooms, and you may find your quilt baby blanket turns into something that is passed down from generation to generation.
It is pretty to learn to sew quilt squares, you can do it by hand or with a machine. You can find an entire kit at the craft store that will provide you with the instructions, and all the material you need to make a square. Most of these kits you buy one square at a time, then put them all together. This makes quilting a little less overwhelming, since you only have to focus on getting one square at a time done. When it comes to the actual quilting of the blanket you can do it yourself or you can also pay someone else to do it for you. There are machines that make quilting very easy, but unless you are going to do a lot of quilting it might be more economical to have someone else do the quilting or do it by hand.
A great way to make a memorable quilt baby blanket gift is to get the whole family in on it. Each family member can make a square or two. You can use cloth markers to inscribe special messages from each member. You can choose to have everyone work on the same type of squares or you can have a mix and match baby quilt with a variety of square patterns. Both are lovely.
You can also get ahold of the grandparents to be and see if they have any clothes or blankets saved from the parents' childhood. If they do you could include these fabrics in the quilt for their child making it a multi-generational quilt, which will no doubt be a family heirloom.
When choosing colors and themes for a baby quilt the sky is the limit. You can go with bold exciting colors, cartoon characters, or you could even call and talk to the parents and find out what color they are planning for the nursery to match your quilt to the theme of the room.
Making a quilt takes some time and effort. You may want to get started as soon as you find out your loved one is having a baby. This will leave you plenty of time to get the quilt done, and contact other family members who want to be involved in the project.
I know the quilt baby blanket gift we received holds a very dear spot in our hearts. It is a family treasure, and although we use it now, I may be tempted to put it away and save it for when my daughter has a baby.
Find more unique baby blanket gift ideas. For those who don't like to sew check out our no sew baby blanket gift instructions.
Article Source: http://EzineArticles.com/?expert=Jackie_Lee
http://EzineArticles.com/?Great-Ideas-For-a-Quilt-Baby-Blanket-Gift&id=1429844
For a great baby quilt pattern take a look at the "Mother Goose Baby Quilt" pattern from Quilting Weekly.
Wednesday, July 8, 2009
Organic Baby Quilt ideas
Giving a baby quilt is rewarding and satisfying in it's self. But if you can make it organic, then you will feel even better as you know it will be good for the baby, the mother and our planet. This article will give you some tips on getting started.
Organic Baby Quilt
You can quickly make an organic baby quilt for the newest member of the human race. When you are invited to a baby shower or you are having a baby you know that one of the best present that you can give a baby is a quilt. The quilt will not only be used when the baby is small, but can be used as a keepsake when the baby grown and have babies of their own.
You can make a quilt easy. To make it organic you will want to make it using organic material. There are many variations of organic material available that you can create a unique baby quilt that is truly one of a kind.
To make a baby quilt you will want to cut out blocks of materials this will become the top part of the quilt. Depending on how large you will want the quilt is how many blocks you will cut out. You can make the blocks out of different patterns that you can then mix and match on the top of the quilt. Once you get the blocks cut out you will lay them out to see how you want to position them. Then sew them together. You have now completed the top of the quilt.
Once you have the top of the quilt designed you will need to cut a piece of fabric for the bottom of the quilt. Make this about the same size as the top blocks.
To assemble the quilt you will put the top of the quilt then batting and then the bottom. Sew these together you won't have to worry about the raw edges because you will be adding something to that. Once it's sewed, you will want to take binding tape which come in many different colors and wrap that completely around the quilt so that it gives a finished even look on both sides of the quilt.
It doesn't take long to make the quilt and it will be a treasured item for the baby and the family of the baby.
Just because you want to purchase all organic baby supplies you won't have to break your budget. It doesn't have to be expensive to buy organic baby toys and diapers. If you want to be a natural shopper and shop organic you can do it easily as more and more items are now being produced organically.
Article Source: http://EzineArticles.com/?expert=Jackie_Chapman
Need a fun idea for the quilt top?
Check out this Mother Goose Pattern found at Quilting Weekly
Organic Baby Quilt
You can quickly make an organic baby quilt for the newest member of the human race. When you are invited to a baby shower or you are having a baby you know that one of the best present that you can give a baby is a quilt. The quilt will not only be used when the baby is small, but can be used as a keepsake when the baby grown and have babies of their own.
You can make a quilt easy. To make it organic you will want to make it using organic material. There are many variations of organic material available that you can create a unique baby quilt that is truly one of a kind.
To make a baby quilt you will want to cut out blocks of materials this will become the top part of the quilt. Depending on how large you will want the quilt is how many blocks you will cut out. You can make the blocks out of different patterns that you can then mix and match on the top of the quilt. Once you get the blocks cut out you will lay them out to see how you want to position them. Then sew them together. You have now completed the top of the quilt.
Once you have the top of the quilt designed you will need to cut a piece of fabric for the bottom of the quilt. Make this about the same size as the top blocks.
To assemble the quilt you will put the top of the quilt then batting and then the bottom. Sew these together you won't have to worry about the raw edges because you will be adding something to that. Once it's sewed, you will want to take binding tape which come in many different colors and wrap that completely around the quilt so that it gives a finished even look on both sides of the quilt.
It doesn't take long to make the quilt and it will be a treasured item for the baby and the family of the baby.
Just because you want to purchase all organic baby supplies you won't have to break your budget. It doesn't have to be expensive to buy organic baby toys and diapers. If you want to be a natural shopper and shop organic you can do it easily as more and more items are now being produced organically.
Article Source: http://EzineArticles.com/?expert=Jackie_Chapman
Need a fun idea for the quilt top?
Check out this Mother Goose Pattern found at Quilting Weekly
Sunday, November 9, 2008
Find a Cure!
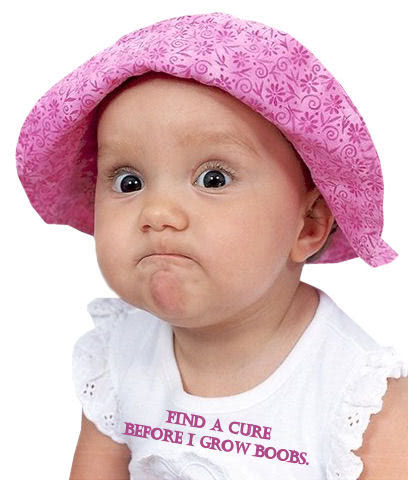
Ok, I couldn't resist this! Thanks to Michelle on the Quilting Gallery. (you said feel free to copy and share) Well this is one that I will do just that!
Too cute and to the point! As Michelle said, go ahead and copy and distribute this to your friends. Spread the word about breast cancer.
Comments? feel free to leave them I love to read them.
Saturday, August 9, 2008
Baby quilt photos
Here are those photos I was promising you from the baby quilt. I finished it a couple of weeks back and just haven't had the time top post them. Take a look at the quilting on some of the close ups. (I think it looks pretty good for me) Free motion quilting is something that takes practice, and with each piece I do I get better and better.

This one shows the my pieced block which I designed. I call it my sailboat block. Because the corners look like little sailboats. What do you think?

Here is a close up of the signature panel. See how the stippling around the names makes them pop out.

This last one shows how you can practice free motion quilting using panels. You can practice outline quilting around the designs, and then do some stippling in the background.

And here is another example of free form quilting on another block from the panel.

This quilt was loads of fun to do. So much fun that I decided to teach you how to make one like this for you own. Just head over to Quilting Weekly (my online classroom website) And sign up. Registration opened this weekend. August 9, 2008. Registration for the site is free, and the full 2 month subscription to the class is only $37.50!

This one shows the my pieced block which I designed. I call it my sailboat block. Because the corners look like little sailboats. What do you think?

Here is a close up of the signature panel. See how the stippling around the names makes them pop out.

This last one shows how you can practice free motion quilting using panels. You can practice outline quilting around the designs, and then do some stippling in the background.

And here is another example of free form quilting on another block from the panel.

This quilt was loads of fun to do. So much fun that I decided to teach you how to make one like this for you own. Just head over to Quilting Weekly (my online classroom website) And sign up. Registration opened this weekend. August 9, 2008. Registration for the site is free, and the full 2 month subscription to the class is only $37.50!
Friday, July 25, 2008
Baby Quilt is finished!
I have been so busy lately with the baby quilt that I feel I have been neglecting my blog.
The baby quilt is finally done, and in the hands of the new mommy! She got her surprise shower last night and boy was she ever surprised! An entire dance studio with loads of moms, teachers,and students of all ages, and no one spilled the beans! It was awesome to see her expression when she came in. She thought she was coming in to teach class one last time, instead she walked into a room full of smiling faces of students and parents.
When she opened the quilt she was moved to tears! She absolutely loved it. What a relief. I was so stressed out the past week rushing to finish it for her. As I mentioned before I thought I had much more time on this since her due date was not till September. But her doctor thinks it will be here much sooner. (Guess the date was off) So they rushed to get her a shower before it was too late. That meant I had less than a week to finish quilting and binding. Whew! I made it with a couple of days to spare.
Pictures you say? Well I have plenty to share. I just need to resize them. So later today or tomorrow I can upload them I hope.
The baby quilt is finally done, and in the hands of the new mommy! She got her surprise shower last night and boy was she ever surprised! An entire dance studio with loads of moms, teachers,and students of all ages, and no one spilled the beans! It was awesome to see her expression when she came in. She thought she was coming in to teach class one last time, instead she walked into a room full of smiling faces of students and parents.
When she opened the quilt she was moved to tears! She absolutely loved it. What a relief. I was so stressed out the past week rushing to finish it for her. As I mentioned before I thought I had much more time on this since her due date was not till September. But her doctor thinks it will be here much sooner. (Guess the date was off) So they rushed to get her a shower before it was too late. That meant I had less than a week to finish quilting and binding. Whew! I made it with a couple of days to spare.
Pictures you say? Well I have plenty to share. I just need to resize them. So later today or tomorrow I can upload them I hope.
Thursday, July 17, 2008
Mother Goose Baby Quilt
 The baby quilt is almost finished yipee! Which is a good thing, as the shower just got moved up to next week. The baby may be here sooner than anticipated. So I need to get the quilting finished and add the binding. Oh boy, nothing like a little push to finish a project.
  Here you see the signature border that I added last. The photo above does not show this. This quilt will be for a dance teacher and I had her students sign the borders and then added them last. She should really be surprised on this and I do hope she enjoys it for a long time to come.
 By the way this quilt will be my next class at Quilting Weekly. So if you love it as much as I do, then you might want to check back to see when registration opens up for this one.
Sunday, March 23, 2008
The making of a siginature quilt
Just got the news recently that one of my daughters dance teachers is going to be a mommy for the first time! Whoo hoo =D
So of course this means an opportunity to make a quilt. Ahhh a baby quilt. I have not had the opportunity to make one in a while so I am really looking forward to this.
I plan on making a signature quilt. I would like to have all the students and other staff members sign it. If there is room maybe even some of the moms might what to sign as well.
This is going to be a surprise. And keeping it a surprise may be a challenge. But I am up for it, and I hope the staff is too. Since they are going to be the ones to get the signatures without letting the teacher see it.
I found the backing fabric, and have the signature fabric now all I need is my pattern. I found a couple in a magazine I liked, but not sure if I will use them yet. I like to do my own designs, so I might just use these for inspiration.
The backing fabric is a soft flannel in white with pastel foot and hand prints on it. Soooooo cute! I found it at JoAnn Fabrics.
Before I start to sew this, I will need to prepare the signature fabric. To make things simple (and since I don't really know how many signatures there will be)I will just cut strips of fabric to be used in the borders. I was going to make individual blocks, but then this quilt might be gigantic! So wide borders will give more space and it will be easier for the dance studio to work with.
I will cut the over sized borders and put freezer paper on the back. That way it will be stiffer and easier to write on. I tested a few fabric markers and found that they bleed through to the back so the paper will keep things from bleeding on the counter when they are signing it. Once they are done, I can peel off the paper and heat set everything. Then sew them on the quilt.
I hope this all works. Since I will be cutting the borders, before I start the top. Kind of backwards from how I usually work. I guess if the top is larger than the borders, then I can add corner blocks or some other form of piecing to fill in the lengths if needed.
Well I am off to cut the borders, and add the freezer paper. Wish me luck!
So of course this means an opportunity to make a quilt. Ahhh a baby quilt. I have not had the opportunity to make one in a while so I am really looking forward to this.
I plan on making a signature quilt. I would like to have all the students and other staff members sign it. If there is room maybe even some of the moms might what to sign as well.
This is going to be a surprise. And keeping it a surprise may be a challenge. But I am up for it, and I hope the staff is too. Since they are going to be the ones to get the signatures without letting the teacher see it.
I found the backing fabric, and have the signature fabric now all I need is my pattern. I found a couple in a magazine I liked, but not sure if I will use them yet. I like to do my own designs, so I might just use these for inspiration.
The backing fabric is a soft flannel in white with pastel foot and hand prints on it. Soooooo cute! I found it at JoAnn Fabrics.
Before I start to sew this, I will need to prepare the signature fabric. To make things simple (and since I don't really know how many signatures there will be)I will just cut strips of fabric to be used in the borders. I was going to make individual blocks, but then this quilt might be gigantic! So wide borders will give more space and it will be easier for the dance studio to work with.
I will cut the over sized borders and put freezer paper on the back. That way it will be stiffer and easier to write on. I tested a few fabric markers and found that they bleed through to the back so the paper will keep things from bleeding on the counter when they are signing it. Once they are done, I can peel off the paper and heat set everything. Then sew them on the quilt.
I hope this all works. Since I will be cutting the borders, before I start the top. Kind of backwards from how I usually work. I guess if the top is larger than the borders, then I can add corner blocks or some other form of piecing to fill in the lengths if needed.
Well I am off to cut the borders, and add the freezer paper. Wish me luck!
Subscribe to:
Posts (Atom)
