Showing posts with label learn to quilt. Show all posts

Wednesday, July 22, 2009

Easy Sewing Projects For Beginning Quilters and Anyone Else

Easy Sewing Projects For Beginning Quilters and Anyone Else


Easy Sewing Projects For Beginning Quilters and Anyone Else
By Maybelle Maddison


OK. So you have decided to take the plunge and start quilting. The challenge is that you do not feel comfortable with your sewing machine. What you need are some easy projects to get you started, but that do not feel like you are wasting your time. The following list of projects make great gifts and you will also have great practice when it comes to tackle your first quilt.


Wallets


Wallets are wonderful. What I'm thinking of specifically, is the Wonder Wallet pattern by Lazy Girl Designs. I've made so many of these because they are easy and practical. Over Christmas I used them as gift card holders. Because they only use half a fat quarter, you can go crazy over novelty prints without taxing your budget. With this pattern, you will get used to sewing in a straight line and using your walking foot.


Once you are confident with wallets, your next project can be a quilted purse.


Pillowcases


Pillowcases are all straight lines. Again, using novelty prints, these makes great gifts for young kids. I made pillowcases last Christmas out of High School Musical flannel. My nieces loved them!


Another benefit is that once you feel confident with your skills, you can make a quilt out of the same material. The recipient will get both the quilt and pillowcases. Now that is thoughtful!


Coasters


Folks who work in offices will appreciate a set of coasters to keep their desks nice. The upgrade for this project will be place mats to match the coasters.


Bookmarks


A quilted bookmark is the perfect gift for the reader in the family. You can choose the fabric and design according to the recipient's hobbies. Adding a book with this gift would be a nice touch. Another option is just to make a bookmark for yourself. I know that I have a hard time keeping up with them.


Tote bags


You can easily find tote bag patterns all over the Internet for good reason - they are easy and practical. If fact, you can have a tote bag for different reasons. You could have a tote bag for the grocery store, a tote bag for the library and a tote bag for work. You'll learn how to sew in a straight line. If you are a ready to branch out, you could use a quilt block as decoration on the bag.


Cranking out wallets, pillowcases, coasters, bookmarks and tote bags will have you getting comfortable with your sewing machine in no time. While you're producing lovely handmade goodies, you'll also be preparing yourself to start quilting.


Maybelle Maddison is a true Southern Belle and dedicated quilter. She has made it her mission in life to spread the joy of quilting! Visit her site at http://www.joannfabrics.org for quilting information, pattern reviews and suggestions on how to start and keep quilting!


Article Source: http://EzineArticles.com/?expert=Maybelle_Maddison
http://EzineArticles.com/?Easy-Sewing-Projects-For-Beginning-Quilters-and-Anyone-Else&id=1063521


For a fun Tote bag pattern that uses something you already have in your sewing room, try Raking Leaves Tote bag pattern from Quilting Weekly

Wednesday, December 10, 2008

Online Qulting Class

Quilting Weekly has just released a new class. Raking Leaves is a great class for beginners and more confident quilters alike.


Are you looking for a fun and easy project for a last minute gift? This class has not one idea but four unique gifts you can make with fabric scraps and selvages that would ordinarily be destined for the landfills. Go green and make a great tote that you would be proud to carry on your next shopping trip!

Raking leaves is perfect because there is no set day or time to attend class you simply purchase the class and then download it to your computer! You can work at your own pace. It couldn't be any simpler. Quilting Weekly stands behind all their classes with a money back guarantee.

Sunday, October 26, 2008

Easy Pot holder Tutorial

Making pot holders is a quick and easy way to use up leftover fabric. If you have an excess of fat quarters this is a good project to use them on.

I am making several as holiday gifts for a few friends in the neighborhood. I like to drop off a little holiday cheer on the doorsteps of my close friends and neighbors. This year it will be pot holders and a few treats!

I thought you might enjoy a quick tutorial on how to make these for your friends.

Cut a front and back fabric (9 inches square)


Next cut 1 (9 inch) square of cotton batting, and 1 (9 inch) square of Insul-Bright


Layer them in the following order:


  1. top fabric, right side up

  2. bottom fabric, wrong side up


Finally add the cotton batting as the top layer.


Pin it all together making sure to leave one side open to turn pot holder right side out.


Sew all the way around the outer edge. Make sure you back stitch at the beginning and at the end of the open side. This way your stitches won't be stressed when you turn it right side out.


To make the corners easier and cleaner I clip the corners before turning the pot holder right side out.


Once you turn the pot holder right side out, you should press the edges square. Fold the raw edges in to meet up with the seam line, pin and hand sew this closed. (like you would do for a pillow).

To keep all the layers nice and secure you should do some quilting on the pot holder. Here are the front and back views of my quilted pot holders.


That is all there is to making a pot holder. You can make these in festive holiday prints for gift giving. You could also make them in fun "food" prints or any kithen themed fabric to use year round.

I hope you enjoyed this tutorial. It is for personal use only and the photos and instructions may not be copied without my consent.

Sunday, January 6, 2008

Design Choices or Mistakes?

Design choices or mistakes, how do you see it?

I say in quilt making there are no mistakes, only design choices to be made. (These are some very powerful words to live by in your quilt making). And something I learned many years ago in a quilt class I took. I used to point out all the mistakes I made in my quilts, before the viewer even had a chance to admire the quilt. You may ask why would I do that? The answer is simple, I though that the mistakes were the only thing anyone would see, and I felt I needed to justify why I continued making the quilt even though there were such obvious mistakes being made. You see, as the quilt maker, all I saw were the problems I had in making the quilt, whether it was a seam that didn't match, or a point that got cut off, or wobbly quilting lines. But to my surprise most of the viewers only saw a beautiful quilt and were amazed and impressed with the workmanship in the quilt.

Quilt making is a process, and a journey so enjoy the ride. As long as you continue to make quilts, you will improve your skills, and continue to learn and grow along the way. This I can gaurantee! So the next time you feel the need to point out a mistake, think about what you improved on or what new skill you learned. Try to talk about that instead of the mistakes that might have been made. (You will feel much better about your quilts, and your viewers would never dare point out any mistakes I can assure you of that!)

Go ahead, look past the mistakes and see what you've learned and accomplished on your previous quilts!

This is a post from the news section on my website. Quilting Weekly. This website is dedicated to helping quilters. It is an online quilting classroom, where you can always get an answer to you quilting questions!

Friday, January 4, 2008

This Quilt is where it all started part 3

I know I started this story awhile back, and I do apologize for taking so long to finish it. I can make excuses for my delays, but really do you want to hear them? Or would you prefer I just get on with it? Ok I hear you, I will get back to the story.

If you have not read part-1 and part-2 of the story you may want to check that out before continuing on. (Even if you did read it, you can refresh you memory if needed by clicking the links above.

The rest of the story behind my first quilt

A I continued to sew the 2" inch squares in rows, I soon realized I had a lot of squares to sew! In the process of sewing these squares, I also learned about the all important 1/4 inch seam allowance. Now mind you, at the time I was sewing on a very basic sewing machine. It was a machine that my sister-in-law had given me sometime ago. Just to give you an idea of the machine I was using here is a link to the manual along with a pretty good picture of the Kemore I was using. By the way, this site is a good resource for finding manuals, and parts for your older Kenmore machines, as I know I am not the only one out there with an old Kenmore! Please tell me I am not.

As you can see there were no fancy features, just a basic machine. It was a work horse of a machine and with all mechanical parts. Making it very heavy, but also easy to clean and maintain. Unlike the newer electronic ones of today. But 1/4 foot? I did not even know that existed. Never making a quilt before, or ever reading a pattern for making a quilt, how would I. Most seams I had worked with were for clothing which typically were 5/8 inch and were marked on the plate under the presser foot. My needle only had center, no positions there to choose from either, so I had to figure out what a 1/4 inch seam looked like,and then try to keep it consistent. Not an easy task if you do not have the right foot, or setting on your machine. (oh how spoiled I am now!)

To shed some light on how you can solve this problem (in case any of my readers out there do not have the fancy machines of today)I will explain a way to find and mark this on your machine.

Help me find my quarter inch!

One of the easiest ways to do this is take a ruler (quilters ruler with 1/4 inch markings on it)and place it under the presser foot. If you need a look at what a quilters rule is here is one by Omni Grid. Of course there are other brands out there, this is just one I use. do not lower the presser foot Now turn the hand wheel so that you lower the needle down so it touches the ruler on the 1/4 line from the edge of the ruler. Move the ruler as needed to get it exactly on the line. Now take a pad of "post-it notes" and place them next to the right side of the ruler. Stick them to the bed of the machine. This will help in two ways, by making the 1/4 inch easy to find, and it also gives you a nice edge to but the material up against.

Another method is to find the 1/4 inch spot the same way as above, but instead of using the "post-it-notes" you place a place several layers of painters tape on the bed of the machine. It works the same way. You can also just draw a permanent line on the machine which will show the mark, but there is room for error as there is no edge to press against. Which can result in an uneven seam. (of course that is what I did before I learned about the tape or post-it method. So you know that I had some issues in lining up my blocks later on! Oh yes I said I had to learn things the hard way, as I was too anxious to get to sewing, and did not take time to read the nice book I had, or ask questions at the fabric shop.

Lessons learned here "Ask questions the ladies at the fabric stores all love to help new quilters. And they are full of helpful tips like the one I shared above. In fact that is where I got it from." (and you thought I can up with that all by myself!)

Now the next thing I would like to tell you about has to do with being accurate. It is very important with any project to check and double check along the way. (This is something I still struggle with today) As you cut your blocks take a moment and verify they are all the same. When cutting lots of the same thing it is easy to switch measurements when you get distracted. I like to place a piece of colored tape on the ruler in the spot I need to remind me of my measurements. Hey they even sell tape in the quilters section of most fabric stores now just for that very thing! Check it out here is what it looks like at JoAnn Fabrics. I am sure if you looked in your husbands tool box you may find he has some thin painters tape that would work too, but the ones from JoAnns come in pretty colors!

When it comes to accuracy you need to also make sure you check your seams periodically to be sure they are still maintaining the proper seam allowance. We can tend to slip once in awhile, and better to catch a few off blocks then lot's of them. Sometimes you can press them into submission if the difference is slight, but more times than not, you will have trouble down the road. Especially if you are making more complicated blocks with lots of pieces. So get in the habit now of checking and rechecking with each new step in the block. Trust me you will thank me for this some day.

I thought I would get to the end of this project here, but looks like things are getting longer than I anticipated so I will need to finish off tomorrow with the quilt sandwich, quilting and binding lessons I learned.

I do hope you are enjoying reading this story, and if so, bookmark me, or subscribe to my feed so you will not miss a lesson. Feel free to leave me comments on my page I love to hear from my readers.

Saturday, December 29, 2007

How do I cut my quilt blocks?

How Do I Cut My Blocks? This is a question I get asked a lot. So I thought this might shed some light on the subject for those of you who want to know.

Here are some various ways to cut your fabric for quilt blocks. Take a look at the different ways to cut your fabric, and see the benefits of each one. Then choose the one that is best for you.
What method is best for my project?

Templates –

1) Good for single blocks.
2) Good for hand piecing.
3) Can be very accurate. (Depending on your ability to trace and cut accurately)

Cutting blocks with a rotary cutter, ruler and mat-

1) The use of rotary cutters, rulers and mats, with proper use can lead to very accurate blocks.
2) It allows you to cut multiple layers of fabric at once, resulting in more blocks with less time.

Paper Piecing also known as foundation piecing –(using random pieces of fabric)

1) Good for unusual shapes.
2) It is very forgiving.
3) It is a great way to use up left over scraps of material, and almost eliminate precutting.
4) Can be very accurate.

Strip Cutting, or Piecing –


1) A quick way to make several blocks of the same style, shape or size.
2) It is fast, easy and accurate.
3) It makes better use of your fabric.

For more great tips like this, please bookmark my site or add me to your feed reader to keep up on all my latest posts. You can also check out my online classroom "Quilting Weekly" where you can get all your quilting questions answered in our forums, classrooms, chatroom, or e-mail our teachers directly!

Friday, December 28, 2007

New classes & New Teachers

With the new year fast approaching, I want let everyone know that we are creating an entire new list of classes over on Quilting Weekly. Along with the new classes that are in the works, I am on the hunt for new teachers. Yes that means there will be more material and different quilting styles to choose from.

I love creating classes and I will continue to do so. But although I feel very confident in My ability to teach quilting, I can not possibly be an expert in all areas of quilting. (I would like to try and learn as many as possible) But in the mean time I think the addition of new teachers will bring a refreshing change to the site. I do hope that if you have not registered for this site yet you should at least do that and bookmark it for reference. The site again is (quilting weekly) By the way there is no cost to register, and you can still check out the forum and other parts of the site without spending any money I promise ! If you like a class then you can register for it with confidence as we have a money back guarantee on all our classes.

Well as soon as I have more information on who these teachers are, and what types of classes we will be adding I will post it here. So please bookmark my blog, for all the latest updates.

Wednesday, December 26, 2007

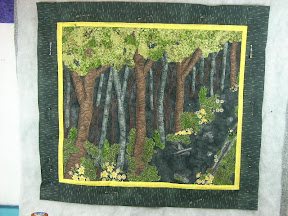
My First Attempt at Landscape Quilting


Here is my first attempt at a landscape quilt.

As you can see by the photo, I am not done quilting it yet. I am finding that to be the most challenging part. I am outline quilting the tree trunks, which helps them stand out. The tops of the trees I think I will do a meandering or stippling. As for the bushes, I have tried to do leaves, but the fabric print has such small leaves that I am finding it difficult to do. I guess I will just have to keep at it and maybe it will look better when it is all done.

I had lots of fun finding my fabrics, fussy cutting and laying it all out! Even though it was a very tedious process. I never realized how difficult it was to find tree fabric. (with a little patience I found what I wanted) The gray trees, are actually the back of the black border fabric! So you just never know where you will find your fabrics.

After finding the fabrics, I also attempted to do some fabric painting and added some details with fabric markers. (now that was fun) The thin brown trees are actually done with markers. The details in the gray trees were added with markers as well. I even emphasized some of the grain lines in the larger brown trees. Pretty cool huh!

I wish I would have photographed the entire process to show you. It was very different from anything I have done in past quilting projects. Because this was so much fun, and I really like the results, I will be doing more of these in the future. So check back if you are interested in landscape quilts. I promise that the next one will include some extra photos.


In this photo you can see I tried to make the path look like it was a stream. At first I thought it was a good idea, but after looking at it on the wall for over a week I finally decided it was not working. All I saw was the blue fabric, which distracted from the rest of the quilt.

What do you think? I would love to hear your opinions.

Saturday, December 8, 2007

Free Quilting Class Online

How would you like to take a Free class? Quilting weekly is a new website that offers quilters what they need! A place to take a class at your own pace, in your own home and at a time that is convenient for you! No more lugging your heavy machines to class. No more expensive supplies to buy only to find your class has been canceled. (We never cancel classes) And the best part is the site is free to sign up for. Once you register you will automatically be registered for our Free Friendship Star Class. You can hang around as long as you like in our forums and meet other quilters, post questions and get answers quickly as our forums are checked daily. There are many other informational parts to the site, so have a look around and let us know what you think. Simply click the"contact us" and send an e-mail we love to hear from our readers and students.

Tuesday, November 27, 2007

This Quilt is where it all started

We all need to make at least one quilt, to consider ourselves a quilter. Well for me this was that quilt! Not bad for a first quilt.

This quilt was quite an ambitious project for a first quilt. It looks great (well at least I think so)in this picture, but I am going to share some of the mistakes (or as I now call them design choices) I had to make in completing this project along with the story behind the beginning of my quilting journey.

First of all understand that when I made this quilt all I knew about quilting was you were supposed to sew squares together, layer it then top stitch the layers. Even though I had been sewing for years prior to discovering quilting I did not know much about this process or how much was really involved. After all how hard could it be to sew a few simple squares together after making clothing or Halloween costumes. Which before quilting that was what I worked on along with a few craft projects now and then.

Inspiration from television

My interest in quilting started after stumbling onto a cable channel where I saw a show on making quilts. Most of you should know the show I am taking about and the genius behind it. The show I am referring to is Simply Quilts with Alex Anderson. Alex has also written many books, and now has her own website "The Quilt Show" with Ricky Tims (he has his own site too which you can check out here). These sites are both worth looking at. (Alex and Ricky I hope you enjoy the free advertising. {{smile}} and maybe someday you can do the same for me! Wouldn't that be great to get some endorsement from them on Quilting Weekly. Ahh to dream is wonderful.

I think the episode I was watching was on crazy quilting. With crazy quilting you don't even need a pattern, all you need is scraps of fabric. Well as a sewer I had scraps of fabric and this did not look hard at all. So I sat down and looked through my scraps and tried it out. (Much to my disappointment, I did not like the results) It was too random and scrappy for my taste. I don't even think I got past the first square before I decided I needed more structure. But where to begin? After all all, the books I had at that time were on garment sewing, nothing for quilt inspiration there. So off I went to the fabric store. {{grinn}} Even then the fabric store was like a candy store to me.


What I found at the fabric store

I soon discovered a new section in the store, one dedicated to quilters! What an exciting discovery it was. Now I had been in this store for years, but never noticed all the books, tools, and gadgets that were just for quilters. Needless to say, I started looking at the books for my instructions, and inspirations. Well as you can imagine I lost hours in that store. (Good thing my husband doesn't keep close track of my where abouts during the day). He would have never understood how I could loose hours looking at all the books, and quilting toys. I soon realized I needed to start at the beginning. I needed a book that could take me all the way from fabric squares to bindings.

This book is still a book I use today. It is one that I recommend any new quilter purchase. This book is the how to of how to books. It covers everything from tools to fabric, to bindings. There are sections from beginner to advanced techniques, from hand quilting to machine quilting. I like to call this the "A to Z" quilting book. It is "The Complete Guide to Quilting" by Better Homes and Gardens. It comes in a paperback and a hard cover version. If you can afford the hard cover it will be well worth the extra dollars. The hard cover version has nice spiral binding, so the pages lay flat.

After purchasing this book, and reading the first section I soon realized that I needed a few basic tools as well. Rotary cutters rulers and a mat would make cutting my squares much easier. (here is an article on these tools if you are not familiar with them) After purchasing my book and my tools I was drawn to the fabrics. {{grinn}} yes the wonderful fabrics...................

The next part of this story will take you though the fabric selections and cutting of the squares. So come back again if you want to hear the rest of the story.

Monday, November 26, 2007

My Online Quilting Classroom website

One of the main reasons I am doing this blog is to help spread the word about my website which is dedicated to teaching quilting to anyone who wants to start quilting or just improve on the quilting skills they already have.

This website is not entirely my own, I have some wonderful and helpful partners who happen to live in Australia. I however live in the United States. I met my partners through another website which they own. It is called "Creative Quilting" and can be found at http://www.creative-quilting.com

I joined this site when it was first opened back around December of 2006. The site was free then, but since then it has become a paid subscription site. They did keep a limited membership that is still totally free, but with the paid subscriptions you get access to much more information. (it is one that I recommend you check out. There is a lot o great quilting information there.
Totally worth the money!

After joining this site, I found myself logging into the site several times a day. It became addicting to see what others were writing in the forums. I also found myself answering many basic quilting questions. The type of questions varied from simple to more complex. So I did some research if needed to answer the questions, but I was determined to help where I could. That is when the light bulb went off in my head! "This is how I can take my passion to teach people and to help people learn to quilt." Which for years I had struggled to find a way to take my quilting passions into a full time business. I have always wanted my own business, I just did not know how to start one. Let me share a bit more about some of those ideas.

Some of the business ideas I had over the years

For years I had dabbled in many possible business ideas. I tried to make it in the craft fair business, selling my handmade creations. (This is a tough market to break into, unless you have something really unique and lots of them to sell and lots of time to sit and wait for your customers) I found this to be difficult at best, as I needed to block off many of my weekends to sit at these fairs only to make a few dollars. After that I moved into teaching. This was something I did not realize I enjoyed so much until I started. I taught at quilt shops and other fabric stores. Then moved to community centers, park district centers, and even worked with "Girl Scouts" and many other groups. I even did private lessons in my home and traveled to others. It gave me great satisfaction to help others, and to see how excited they were when they finished something for the first time. While teaching I worked at JoAnn Fabrics and for a brief period I found myself in charge of the education department. That was a time when I really saw how much I wanted to help others learn how to create their own projects. I found myself teaching quilting, sewing, knitting and crochet to people of all ages. (children were especially fun to work with) All though I enjoyed the time there and my discount, I found myself dreaming of working for myself instead.

When the idea of owning my own shop came into my head, my husband thought I lost my mind! He said "Are you crazy?" "We can't afford that kind of risk now at this stage of our life." So as soon as I found the dream he squashed it. I know it would have been extremely tough to open a store, and I really did not want to have a store to sell inventory, I just wanted a place to teach quilting. Which to have to pay rent somewhere just for a classroom, and not know if I would have enough students to pay my rent was just that an idea. Not one worth finding funding or worth pursuing.


Back to my website idea

After joining the community on creative quilting I found that there is world out there who wants to learn quilting. I could not bring the world to my store (if I had a brick and mortar store) so why not build a virtual store. That is when I approached Michelle and Simon (the owners of creative quilting) about opening an online classroom. And just like that "Quilting Weekly" was born, and our friendship moved to business partners. I still have not met these wonderful people face to face. All our business is done through the internet. What a wonderful technology based world we live in. This relationship was built on faith and trust without ever meeting in person. Goes to show you there are still good people in the world today.

Quilting weekly is a virtual classroom. We provide you with the classes and all the support you need to complete your quilting projects. Now this is a new site, and still has a lot of work to make it the greatest site on the web. (But give us a little time and we will get there!) One of the things that makes this site so great is the ideas behind it are all driven by the customers who use it. We take our ideas from you the customer and create a site that you enjoy using. Our forums offer the quilter a place to ask and get answers to those pressing quilting questions, or just meet other quilters from around the world who share their same passions for quilting and fabric collecting. There are many other helpful links and pages to explore there to feed your need to learn quilting. If you want to have a a chat with your quilting friends you can use our chat room to do so, just enter the classroom and you will find the chat room link. From time to time we update the new sections to keep you aware of what we are doing on the site. Finally we are building a quilters FAQ's section. Where you can find lot's of helpful tips and tricks. (If you have a tip you want the world to know about e-mail me chris@quiltingweekly.com and I will be sure to add it)

This is about it for today, I must do some other non-quilting related tasks around the house so I can keep the family happy. I do hope to see you some time soon. Go ahead drop me a line by e-mail and tell me what you think. I would love to hear your ideas for my blog and my website. By the way the site is free. So go ahead and register, if you want to take a class then you only pay for that class. I promise there are no other fees or monthly subscriptions involved with quilting weekly.

Take care and happy quilting!
Chris


Search This Blog

Protected by Copyscape Web Copyright Protection Software